30 December 2011

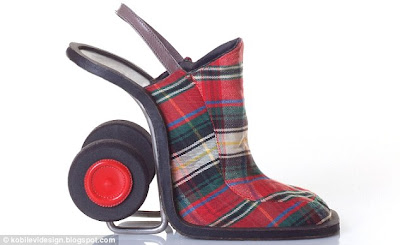
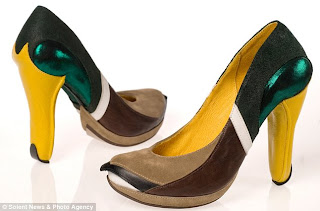
Kobi Levi's Qwerky Shoe Designs

 Mallard, tucan and swan creations.


Banana, blow-up doll(!) and chewing-gum inspired designs.

Olive Oly and Madonna, I love the microphone detail.


Mother & daughter, shopping basket and slide shoes.
By far, this is my favourite. For all you fashion concious grannies out there!

I'm listening to: So Appalled by Kanye West
Images from: kobilevidesign.blogspot.com, designboom.com

22 December 2011

These boots really are made for walking.

If you've read my ☞ About Me ☜ page then you'll know I suffer from a disabling condition. It limits the amount of walking I can do and it means that I have to wear sensible shoes most of the time. This doesn't mean that when I see an amazing pair of shoes at a massive discount I'm not going to pass them by though, does it?!
Kurt Geiger
In my defence they were 70% off and well, don't act like you wouldn't have caved in too! So far I've managed to wear them once (which I think is a triumph in itself) when my bf and I went for a meal on Valentine's Day. I thought it would be the perfect occasion to wear them as the only walking I would be doing would be from the car to the table and back again. HOWEVER. Trust me to chose the one restaurant that had cobblestones outside; it's really hard to look sexy when you can barely stand up. Epic fall fail!

So if you're like me and should really be wearing sensible shoes, have a little look down there (you may have noticed I'm obsessed with symbols at the moment).

ASOS March patent point £40    Topshop Underground Creepers £98    The Outnet Inimarket Boots £210 - 94.50
The Outnet Newbark Flats £295 - 118    Boohoo Chelsea Boots £40    Urban Outfitters £85
Urban Outfitters Dr. Martens £120 The Outnet Belle Sigerson Morrison Loafers £210-105 Miss Selfridge Flats £35-17
 The Outnet Alexander Birman £315-173.25 Topshop POMP Chelsea Boots £100    ASOS George Cox Creepers £195
The Outnet Belle Sigerson Morrison £280-126 Urban Outfitters Deena & Ozzy Boots £75 Topshop ADMIRALBoots £68 

 Caution: although creepers are flat, they're actuallyquite hard and tiring to walk in because the soles are solid and quite heavy. Take a look at my own pair.


I'm listening to: Cheerleader by St. Vincent
Images from: ASOS.com, theoutnet.com, missselfridge.com, topshop.com, urbanoutfitters.co.uk

12 December 2011

Steal Your Boyfriend's Jewellery

Whilst doing a bit of late night shopping with my boyfriend in Topman, somewhere I would never think to go into until, I spotted this on sale in the jewellery section.
£1 down from £8. Bargain!
 I wanted there to be two of them so badly so I could put them on a pair of shoes but alas, there was only one; I'll just have to turn it into a necklace (my DIY light bulb just lit up! Watch this space...)
So it got me thinking I should start frequenting the 'Mens Jewellery' pages on my next online window shopping spree. Here's what I came up with:


From left to right:
(Topman, Urban Male £9.99, Topman £15, ASOS (£8) £6,
    £30)        Asos (£8) £6,   (Urban Outfitters
ASOS £8             (Topman   Cheap Monday (£45) £20)
River Island £10,    £12)          ASOS £6, Topman £8
Urban Male £12.99, Topman £12, Topman £10, Topman £10, ASOS (£12) £9


(That took me AGES and I still think it's super confusing! Sorry.) 

I'm listening to: Christian Dior Denim Flow by Kanye West
Images from: topman.com, asos.com, riverisland.com, urban-male.com, urbanoutfitters.co.uk

9 December 2011

✄ DIY tutorial: Cheap Monday Brooch

What You'll Need:
Brooch
Chains
Rhinestone chain
Jewels
 Jump rings
Superglue
What I Used:
Silver card
Nail varnish
Felt-tip pens


1. I drew around my brooch onto a piece of silver card and cut it out.

2. I then used nail varnish and felt-tip pens to make each jewel different tones of silver and black so they would stand out.

3. I then added two pointed oval jewels either side of the centre (which I soon decided to take off - it looked too cluttered) and decided that it looked better without the silver card backing.

4. Next I cut the jump rings in half for the round jewels and cut a small section out of the rings for the teardrop jewels. Then I superglued the rings to the jewels.

5. Then I cut the jump rings to fit the 5 points on the brooch and superglued them on. (Don't forget to leave the glue to dry for at least 10 minutes otherwise when you try and attach things to it otherwise they will fall off - I made that mistake several times, it's super frustrating.)

6. It took me a while to rifle (and untangle!) through my large pile of chains to choose which colours to use!

7. I measured each length of chain around the brooch and layed the jewels in place.

8. Finally I attached the chains and jewels to the brooch using jump rings.
don't worry there's a better picture coming soon when there's better light, apologies

What do you think of my latest DIY? If you like what you see then spread the word. If you have a go at it please credit me and don't forget to send me your pictures.

I'm listening to: Black Hole Sun by Soundgarden

7 December 2011

✄ DIY tutorial: Romwe Bracelet


What you'll need:
Small link chain
Big link chain
Suede ribbon (the original is leather)
Ribbon clasps
Small jump rings
Lobster clasp
Pliers


1. Measure three lengths of small chain to go round your first three fingers and one length of large chain to go around your wrist.

2. Measure and cut three lengths of suede ribbon (they will be slightly different sizes) and attach the metal ribbon ends. I chose to make the lengths of suede a little longer than the original because it allows for more movement.

3. Attach each length of suede to the large chain using the jump rings (I left two links of chain in between each length of suede) and to the corresponding 'rings' of small chain. Make sure the lengths of suede are the right way up and aren't twisted.

4. Attach the lobster clasp to the large chain and all that's left is to try it on and become the envy of your friends!
P.S I chose to use a beige coloured suede rather than the dark brown of the original because it looked less harsh against my pasty pasty skin!

What do you think of my latest DIY? If you like what you see then spread the word. If you have a go at it please credit me and don't forget to send me your pictures.

I'm listening to: All Falls Down by Kanye West (old skool!)
Images from: romwe.com

5 December 2011

Jane Fonda Was A Hipster Before You

Jane Fonda and co-star from the film The Game Is Over in 1965

I'm listening to: This Is The End by Machinehead
Images from: divinecaroline.com

1 December 2011

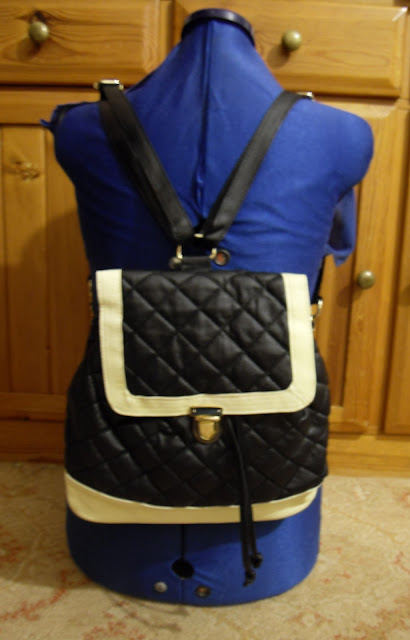
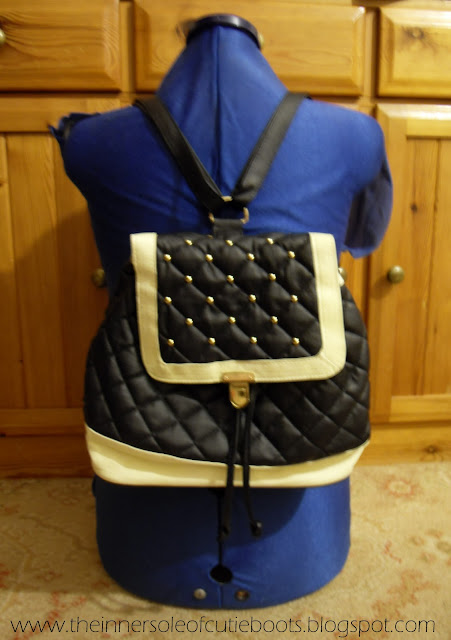
✄ DIY tutorial: Studded Quilted Bag

Here's just a really quick and easy DIY I finished just a few minutes ago on my latest ebay purchase; £9.99 plus free shipping, you can't argue with that! I've been looking for a rucksack for ages since my prediction post that there were going to be a big trend back in March (I also thought I had done a post of rucksacks available at the moment but I can't find it; maybe I dreamt it?! I'll do one now...)
The best thing about studding is that it makes everything look much more expensive than it really is. It's totally true in this case I think.

What You'll Need:
Studs
Your chosen article
Pliers

1. Simply push the prongs of your studs through the material and use pliers to bend the prongs inwards.
Before

 After

I am planning on getting round to studding the whole bag but my thumbs are too sore at the moment so it'll have to wait a while. I think it actually looks quite cool with just the top flap done.

What do you think of my latest DIY? If you like what you see then spread the word. If you have a go at it please credit me and don't forget to send me your pictures.

I'm listening to: Small Talk by Scritti Politti